Linked exits
Find the shared blocker
Three collisions end this attempt. Free retries.
Follow a blocked line to its blocker, then check that arrow's exit.
How to play: tools and arrow symbols
Tap any part of a line. Its head travels straight in the arrow direction, and the tail follows the bends. Clear any lines blocking its exit first. Colors help you follow the lines and do not change the rules.
Tools and controls
- Hint: One free use per attempt. Highlights a safe arrow with a pulsing marker and exit guide, and brings it into view. For a D-marked arrow, the message recommends Head or Tail. Hint does not move the arrow or spend Path sight stock.
- Path sight: Choose the tool, then an arrow to inspect its exit, blockers, required key, ice marks, rubble and marked bomb targets. For a D-marked arrow, choose Head or Tail before the inspection. One completed inspection costs one use; arming the tool or cancelling is free. It never moves, unlocks or thaws an arrow. Read the stock and rewards section below for more details.
- Zoom map: On maps with rubble, enlarge the board and scroll to inspect the routes. Choose Show whole map to fit the board again.
- Restart: Start this puzzle again with a fresh free Hint. Path sight stock carries between attempts; used inspections are not refunded.
- Sound: Switch game sounds on or off with the button above the board. Use Tab and Enter to play with a keyboard.
Arrow symbols and mechanisms
- Key and padlock: A locked arrow cannot leave even when its exit is clear. Release its matching key arrow, then check the unlocked arrow's full exit. Tapping a locked arrow costs no collision.
- Linked reversal: Matching numbered lightning and reversal symbols form a pair. When the lightning arrow leaves, its partner swaps head and tail. The dashed arrowhead previews that future exit; check the new direction after the switch.
- Hammer and rubble: Brown cracked rocks block an exit. Release the matching hammer arrow to remove those rocks and open the corridor.
- Bomb and crosshair: A bomb must escape successfully before its burst clears the matching crosshair-marked ordinary arrow. You may release that marked arrow yourself first. Keys, locks and other special arrows are protected.
- Ice and matching marks: Clear both matching marked arrows to thaw an ice-marked arrow. The first mark cracks the ice; the second thaws it. Each numbered ice group uses its own marks. Thawing does not remove blockers, so check the exit again. Frozen taps cost no collision.
- Dual end (D): A line with two solid arrowheads offers Head and Tail after you tap it. Each choice follows that end's actual arrowhead. A blocked choice counts as a normal collision; opening or cancelling the chooser is free.
The first five learning levels have unlimited tries and award three stars on completion. Later levels allow three collisions per attempt: finish with zero, one, or two collisions for three, two, or one star. Every level can be solved without spending Path sight. Stars depend only on collisions.
Path sight stock and rewards
Choose Path sight, then one arrow to reveal its full exit and every blocking line. Selecting costs one; cancelling is free. It also reports required keys, ice marks, rubble and marked bomb targets. For a D-marked arrow, choose Head or Tail to inspect that exit; cancelling the chooser is free. Path sight never unlocks, thaws or moves an arrow, or uses your free hint.
Get 3 welcome uses once when first entering level 21 or later, and 2 more for each first clear of a chapter ending at level 25, 30, 35, 40 and every fifth level after that. Previously completed chapters receive any unclaimed rewards once. Stock carries between levels on this browser. Restarting or refreshing does not refund a use. Stars still depend only on collisions.
Challenge chapter · three collisions per attempt · saved on this device
A closer look at this puzzle
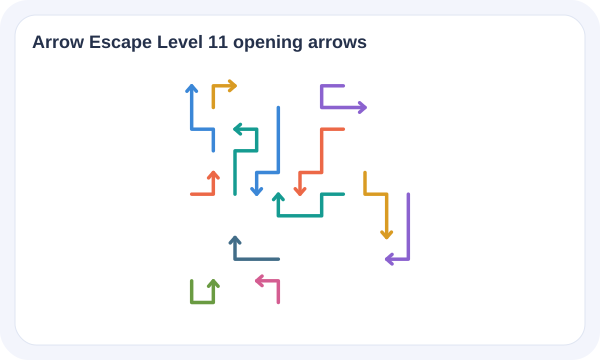
Thirteen bent arrows connect through eight dependency layers. Two exits are open at the start. Trace the blocked lines to discover which removal opens the next connection.
- Board
- 11 × 11
- Arrows
- 13
- Dependency layers
- 8
- Clear exits at the start
- 2
Show a verified opening tip
Start with the blue arrow pointing up, whose head is at row 1, column 1 (counting from the top left). Its exit is clear. Other valid orders may also work.
How do I earn stars?
Three collisions end this attempt. Finish with no collisions for three stars, one for two stars, or two for one star. You can retry for free, and your best result is kept. Using a hint is recorded separately. A clear needs 13 successful removals, one per arrow.