Levels / Level 179

Last Amber Bridge

Target 150 · 9 active colors
Level details

Keep the outer gate in mind while the temporary high landing falls away. Reach 150 points across 9 colors. This board has ordered 2-signal lock at 0,0, ordered 2-signal lock at 2,0, 30-point lock at -3,2, 20-point lock at 3,-2, 40-point lock at 4,-3, 80-point lock at -4,1, 50-point lock at -3,1. The opening includes a 11-layer blue stack at 1,0. Save one stack in the reserve slot, then place it later. The fragile landing at 0,2 closes when a clear empties it.

LIVE CAMPAIGNHexa Stack
SPACE10
Score0of 150
Gates0/70/2 · 20 score → Chain ×2 · 0/2 · ▲ Yellow → 40 score · 30 score · 20 score · 40 score · 80 score · 50 score
Whole board overview-4,0: Empty+-4,1: 80 score80 score-3,1: 50 score50 score-3,2: 30 score30 score-3,3: Empty+-2,0: Empty+-2,1: 4 layers, top yellow4-2,2: Empty+-1,-1: Empty+-1,0: Empty+-1,1: Empty+0,-2: 3 layers, top purple30,-1: Empty+0,0: 0/2 · 20 score → Chain ×20/2 · 20 score → Chain ×20,1: Empty+0,2: Fragile landing!1,0: 11 layers, top blue112,-1: 5 layers, top red52,0: 0/2 · ▲ Yellow → 40 score0/2 · ▲ Yellow → 40 score3,-2: 20 score20 score4,-3: 40 score40 score

Overview only. Use the board below to place stacks. ! marks a fragile landing.

E 0
?
Tools at a glance

UndoNo action to undoRestore the last action. Limited uses; no energy cost.

Tray RefreshNeed 8 more energyReplace the remaining stacks in your hand.

Board RefreshNeed 20 more energyExchange occupied stacks; matching neighbors merge only after your next placement. Needs two different stacks.

HammerNeed 16 more energyRemove one occupied stack to reopen space.

Drag the background sideways to see the whole board
Click or dragUse all 3 to refill
How does a Chain ×2 gate open?

One placement must cause two separate clears. The first clear can expose a lower color; if it joins enough matching layers, that same move clears again.

Tap an occupied stack to inspect its top and next color. This explains the layers without choosing a landing hex for you.
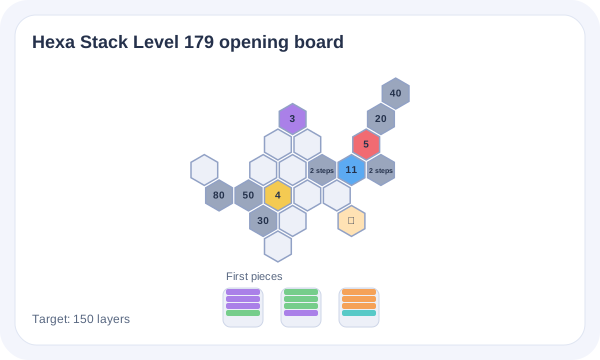
Keep the outer gate in mind while the temporary high landing falls away. The amber landing at 0,2 closes when a clear empties its stack. Store one stack before spending your only reserve action. The late -4,1 and -3,1 landings unlock after their score marks. The added outer landing at 4,-3 opens at 40 score. Hold one stack and bring it back when that branch can use its color. The right branch at 3,-2 opens at 20 points. The left branch reaches -3,3 without a gate. Score starts the center sequence; yellow starts the far-right sequence. An outer landing opens at 30 score.

Move 0 · Clear at 10+
1–4 select · Arrows move · Enter place · U undo · R restart · M sound

Hexa Stack puzzle level 179

How to play Last Amber Bridge

Keep the outer gate in mind while the temporary high landing falls away. Reach 150 points across 9 colors. This board has ordered 2-signal lock at 0,0, ordered 2-signal lock at 2,0, 30-point lock at -3,2, 20-point lock at 3,-2, 40-point lock at 4,-3, 80-point lock at -4,1, 50-point lock at -3,1. The opening includes a 11-layer blue stack at 1,0. Save one stack in the reserve slot, then place it later. The fragile landing at 0,2 closes when a clear empties it.

Hexa Stack Level 179 opening board diagram
Opening board preview for level 179
Campaign difficulty
Hard
Board cells
21
Chapter
Reserve Fractures
Target score
150 cleared layers
Active colors
9

Strategy hint

The amber landing at 0,2 closes when a clear empties its stack. Store one stack before spending your only reserve action. The late -4,1 and -3,1 landings unlock after their score marks. The added outer landing at 4,-3 opens at 40 score. Hold one stack and bring it back when that branch can use its color. The right branch at 3,-2 opens at 20 points. The left branch reaches -3,3 without a gate. Score starts the center sequence; yellow starts the far-right sequence. An outer landing opens at 30 score.